Páginas

Dec 24, 2011

Retrospective and Vacations - Retrospectiva e Férias


2011 was a year of great changes in VOQ! Deside all the projects, we had Workshops whit very interesting results and, of course, the new team!! But now the year is heading to it end, and everyone needs to rest a bit (and enjoy vacation, of course!).. so do us

We will be back on the January 15th with more energy and new projects!
A good holidays for all of you!
See you next year!

2011 foi um ano de muitas mudanças no VOQ! Além de novos produtos tivemos Workshops com resultados muito interessantes e, claro, a formação da equipe! Porém agora é fim de ano, e ninguém é de ferro, então temos que descansar um pouco e, aproveitar as férias né ;)

Voltaremos no dia 15 de Janeiro com mais energia, mais diposicão e novíssimos pojetos!
Boas festas a todos!
Até o ano que vem! 


VOQ team/equipe

Dec 17, 2011

PVC Pipe Lamp - Luminária de tubo de PVC

Hey there!
New project coming!

Olá!
Projeto novo!

Today we´ll show a project of a very simple lamp made with scraps of PVC pipes. If you don´t have it in your place you can easily find it in a garbage of a construction area because it is used in hydraulic system of buildings.

Hoje vamos mostrar como fazer uma luminária muito simples a partir de sobras de tubos de PVC. Se você não tem isso na sua casa é muito fácil de encontrar em construções, esses tubos são normalmente usados em sistemas hidráulicos.

To make this lamp I used: A piece of PVC pipe, a hacksaw, electrical parts (electric wire, light socket and plug), a small fluorescent light bulb, a screw and my stove (you should use a heat gun if you have it, or another heat source).

Para fazer essa luminária eu usei: um pedaço de tubo de PVC, uma serra de arco, sistema elétrico (fio, soquete e plugue), uma lâmpada fluorescente pequena, parafusos e meu fogão (você deve usar um soprador térmico se tiver ou alguma outra fonte de calor).

First, measure how much pipe you will need. Remember, the same pipe will be used to the base and to the lampshade. Cut the pipe with the hacksaw according to your measure.

Primeiro, meça o tamanho do tubo que vai ser usado. Lembre-se, o mesmo tubo será usado na base e na “cúpula” da luminária. Corte o tubo com a serra de arco de acordo com a medida.

After that, draw a line on the pipe. This line will be a reference place to fold it correctly.

Depois, marque uma linha no tubo. Ela servirá como referência para dobrar o tubo no lugar correto.

Now, turn on your stove and take the pipe. Pass an electric wire through the pipe before folding (it is very difficult to place the wire after the pipe is folded, so better do it before).

Agora, acenda o fogão e pegue o tubo. Passe um fio por dentro do tubo de ponta a ponta. Se você quiser fazer isso depois dele dobrado será muito complicado.


This is the most important step, so be careful and pay attention. First, choose if you want to just fold the pipe or if you want to twist and fold it (check the first picture to see which option you prefer). 
Put the pipe over the stove and keep spinning it quickly. Don´t get so close, keep a distance around 25cm, you don´t want to burn the pipe´s surface.

Essa é a etapa mais importante, portanto tome cuidado e preste bastante atenção. Você vai escolher se quer apenas dobrar o tubo ou se quer torcer e dobrar (veja na primeira imagem qual resultado você prefere).
Coloque o tubo sobre o fogão e gire-o rapidamente de forma constante. Não chegue muito perto do fogo, mantenha uma distância de aproximadamente 25cm, você não quer queimar a superfície do tubo.

When the pipe surface gets soft, fold it carefully to the position you want. To make it hard again just drop water on it.

Quando a superfície do tubo amolecer, dobre-o com cuidado para a posição desejada. Para que ele volte a endurecer despeje água.

After folded, cut the base in angle to balance the lamp weight.

Depois de dobrado, corte a base em ângulo para que o peso da luminária fique equilibrado.

Next step is to assemble the electrical part. As the wire is already inside the pipe, just join the plug and the light socket. Use a screw to fix the light socket in the lampshade. And it´s done! Do the finish you prefer, painting, drilling, drawing, etc.

O próximo passo é montar o sistema elétrico. Como o fio já está dentro do tubo, instale o plugue e o soquete. Use um parafuso para fixar o soquete no fundo da “cúpula”. E está pronto! Faça o acabamento que preferir, pinte, faça furos, desenhe, etc.

That´s it!
Thanks a lot!

É isso!
Muito Obrigado!


Project by/projeto por Walter "Cuco" Neto

Dec 10, 2011

Lamp from Carboard + table / Abajur de mesa + Papelão


Hello!
Ola!

After a little "rest", VOQ restarts the projects with a new team. And to inaugurate this new "era", we will show here three differents ideas of lamps!
Depois de um bom tempo de "descanso", o VOQ! retoma os projetos com um novo time, e para inaugurar esse nosso novo momento, mostraremos aqui três diferentes idéias de luminárias!

Today's project is a lamp made from a table's leg, cardboar and a piece of wood.
O projeto de hoje é um abajur feito com um pé de mesa, papelão e um pedacinho de madeira.

Let's go to the important part and see how you can make yours:
Vamos ao que importa e ver como você se sai ao construir o seu:

Unfortunately today I don't have the picture of the materials that you need, but the list is:
- cardboard boxes; a table leg (or something similar); a piece of wood for the base; electronical components (you can check previous posts to check the exact list); a cutter; glue; hand saw; drilling machine, screws and a screw driver.
Infelizmente hoje eu não tenho a foto dos materiais necessários, mas a lista é:
- Caixas de papelão; pé de mesa (ou algo parecido); um pedaco de madeira para a base; componentes elétricos (você pode checar os posts anteriores para ver detalhadamente quais são os componetes e como montá-los); estilete; cola; furadeira; uma serra (serrote, serra de arco etc) parafusos e uma chave de fenda.

As this project has many steps, I'm split it into 3 parts to make it easier: The base, The shade and The final assembling
Como esse projeto tem muitos passos, eu o dividi em três partes para ficar mais facil: 1. A base; 2. A cúpula: 3. A montagem final.

1 - The base/ A base

First, choose the table leg you will use, I took this one (in the image) from an old Alvar Aalto's table that I found in the trash bin.

Primeiro escolha o pé de mesa que vai usar. Eu peguei este ao lado (imagem) de uma velha mesa do Alvar Aalto que encontrei no lixo.


Cut it according to the height you want, I chosed the base 25cm height.

Corte a perna na altura que quiser. Eu escolhi cortar com 25cm de altura.

Take a piec of wood to make it stable, place the leg on the center, then fix it there with either screws or nails (what suits better your piece)

Pegue um pedaço de madeira para estabilizar a base. Coloque o pé da mesa no centro e então fixe os dois utilizando parafusos ou pregos (o que for melhor e mais fácil para você).


Now, make a hole near the leg to pass the wire, the closer you can get it to the leg, the better the final result will be.

Agora faça um furo perto do "pé" para passar o fio. Quanto mais perto você fizer, melhor o resultado.
Then pass the wire through the hole and then, according to the "closer way out"; you will need to drill a "channel" to put the wire - it can be done by making many shallow holes side by side, (Here you also can see how I fixed the leg to the base with two screws).
Então passe o fio pelo buraco e, de acordo com o "caminho mais curto para fora da base", faça um canal para passar o fio. Esse canal pode ser feito com varios furos rasos lado a lado. Obs.: Aqui você pode ver como eu prendi as duas peças com parafusos.

2 - The shade/A cúpula
 The first step here is to decide the size of the shade, once you decided it (use a parer to prototype the size), cut a base from cardboar.

O primeiro passo é decidir o tamanho da cúpula. Uma vez determinada a medida, corte uma peça inteira para servir de base.  Use um papel para ajuda-lo a simular o tamanho.
 Now, with the same drawing you make it a "frame". Cut this frame into 4 pieces, so it will be easier to assemble.

Agora com a mesma medida, faça uma espécie de "moldura". A divida em 4 partes para ficar mais fácil de cortar e montar.
 If you can, make a model from a harder material (I made one with wood)so that you can cut all the pieces with the same size and easier.

Se possível, faça um molde com um material mais duro, para que você consiga cortar todos os pedaços do mesmo tamanho e com mais facilidade. Eu, por exemplo, fiz meu molde com um pedaço de madeira.
 After you cut a lot of cardboard (the more you cut, the higher will be the shade) glue them layer by layer.

Depois de cortar o papelão, cole-os um por um, camada por camada. Perceba que quanto mais peças você recortar e colar, mais alta ficará a sua cúpula.
Now cut a entire frame, as you made on the step two (before dividing it into four) and glue it on top.

Corte uma peca de papelão no formato da moldura que você recortou no segundo passo (antes de a dividir em 4 partes)e cole em cima. 
Now put something heavy on top and let it dry for at least 12 hours. It will became very rigid and resistent.

Agora coloque algo pesado em cima e deixe secar por, pelo menos, 12 horas. A peça ficará bem dura e resistente.
After it is glued you can make some details, as you preffer, with saw, sad paper, etc.

Depois de colado, você pode dar um acabamento nas laterais e bordas da forma que desejar, utilizando-se de lixas, serras etc.


If you want you can paint it with a spray paint.

E, se quiser, pode pintar usando tinta spray.


3 - The final assembling / A montagem final

Pass another piece of wire through the shade and fix it to the leg with screws. The attach the socket to the wire and fix it to the shade's base also with screws.

Primeiro passe um outro pedaço de fio pela cúpula e monte o soquete. Fixe a base na cúpula utilizando parafusos.

Link the two different pieces of wire (the one brom the base and the other from the shade) with a switch. Then it is ready =) Remmeber that the shade is made from cardboard, therefore you need to use only fluorescent lights!

Junte os dois fios (o da base e o da cúpula) no interruptor. Então está pronto. =)  Lembre-se que a cúpula é de papelão, portanto, só lampadas fluorescentes!


Hope you enjoyed!
Espero que tenha gostado!

This piece is for sale for just 40 euros, for more info, contac viraroque@blogspot.com
Esta peça está a venda por 40 euros. Para mais informacões, envie um e-mail para viraroque@blogspot.com

Thankss!
Muito obrigado!

Project by/Projeto por Nicholas B. Torretta

Nov 25, 2011

New VOQ - novo VOQ

Hello!
Oi!

Well, it has been a long time since the last post....
But there is a reason for it! Virar o quê changed! Now it has a nickname, "VOQ"! Do you think that is all?! No! now VOQ is growing! It became a team! Now we are three designers, and we hope to provide you even better ideas and projects!
As it is said: “two heads thinks better than one”, now imagine three! So first of all let me tell you a little bit of how this change happened and introduce you all the VOQ members:

Bom, faz muito tempo desde o último post aqui.....
Mas há uma razão pra isso! O Virar o quê mudou! Agora tem um apelido, "VOQ"! Mas você acha que isso é tudo? Não!? Agora o VOQ está crescendo! E virou uma equipe! Agora somos três designers, e esperamos criar projetos e ideias ainda melhores! Como dizem "duas cabecas pensam melhor do que uma", agora imaginem três!


What those images means?!!!!!!
O que são essas imagens??????!!!!


They are flashes from our past... whant to know more? Stay tunned for the next post with the history behind the VOQ's members!
Elas são imagens de nossos passados.... quer saber mais? Fique ligado no próximo post onde revelaremos a história por trás dos membros do VOQ!


Now we will have about three publishments every month (one from each member) and we will restart the Workshops projects! for more informtion about workshops, send us an email viraroque@gmail.com


Agora teremos cerca de três posts por mês (um de cada membro) e retomaremos o projeto dos Workshops! 
Para mais informacões sobre workshops, mande um email para viraroque@gmail.com


Besides that now we have a facebook page! There, you you get the notifications of the new posts here and further more, we will use that space to publish links to many different examples of ecodesign, sustainable design, upcicling, etc. where you can also publish the ones you find/create! So just click on the "like" button over there and became a part of VOQ on Facebook!---->

Fora isso, agora temos uma página no facebook! Lá você será atualizado a cada novo post aqui no blog e, ainda mais, é um espaco para colocarmos exemplos e ideias sobre ecodesign, design sustentável  reutilizacão e etc. onde você também pode compartilhar os exemplos que você achou/criou! Só o que tem que fazer é clicar no botão "Curtir" ali do lado---->


1, 2, 3, Go!!!!! Let's start it!
Thank you! Hope you like the news and that you will like even more the new VOQ!

1, 2, 3 e já!!! Vamos comecar!
Muito obrigado! Espero que você tenha gostado das noticias e que goste ainda mais do novo VOQ!!


See you soon!
Até logo!


VOQ team

Aug 31, 2011

key holder from a fork - pedurador de chaves com um garfo


Hello! Sorry about the huge gap between the last post and this one. But I have a reason, I just moved to Helsinki-Finland to do my Master degree at Aalto University (Creative Sustainability). Therefore I´m starting to know the city and I still don´t have any tools nor place to develop new projects (but I hope to solve this problem as soon as possible!).
Olá! Desculpe pela enorme distância entre este post e o anterior. Mas eu tenho um motivo: Eu acabei de me mudar pra Helsinki-Finlândia para fazer um Mestrado na Aalto University (Sustentablidade Criativa). Por isso estou apenas comecando a cohecer a cidade e ainda não tenho ferramentas nem lugar para executar novos projetos (mas espero que consiga resolver esse probleminha logo!).

Another new, is that the blog will pass through a big (and very good) change, but this is subject for a next post, so, keep tuned!
Outra notícia é que o blog passará por uma grande (e muito boa mudanca), mas isso é asunto pro próximo post, portanto, fiquem ligados!

Well, today´s project is very simple, it is a project that I developed in Brazil just before moving to Finland. It is a key holder made from a fork.
Bom, o projeto de hoje é super simples, é um projetinho que eu fiz ainda no Brasil um pouco antes de me mudar pra cá, é um suporte para chaves feito a partir de um garfo.


The materials are: a old fork, pliers, and a sandpaper.

Os materiais são: um garfo velho, alicate e lixa.


Just fold the fork´s teeth in a way that they get a little bit far from each other, so that you have enough space to hang your keys.

Com o alicate entorte os "dentes" do garfo de modo que eles fiquem um tano quanto longe um do outro para que você tenha espaco suficiente para pendurar chaves. 


Then, for safety reasons, sand the fork.

Então, por questões de seguranca, lixe o garfo.


And now all you need is to place it on a wall; here I used  a strong double-sided tape, but you can drill a hole on the fork and hang it in a screw, whatever you thing its better!

Agora só falta você perdurá-lo em uma parede. Aqui eu usei uma fita dupla-face bem forte, mas você pode também fazer um furo no garfo e perdurar com um parafuso ou como preferir!


(Sorry about the terrible quality of the pictures)  
(Desculpe pela horrível qualidade das fotos)

Thanks!
Obrigado!

Project by/ Projeto por Nicholas B. Torretta


Aug 2, 2011

Second class of the workshop - segunda aula do workshop

Hello!
Oi!

Today I’ll show you how was the second class of the workshop at SESC.
Hoje vamos mostrar como foi a segunda aula do workshop no SESC.


Well, in the first class (previous post) the aim was to show to the students that they are able to create and transform their “universe” with simple tool and materials. Therefore, to continue increasing their knowledge in this way, the second class was about exploring and, therefore, discovering the proprieties of different materials.

Bom, na primeira aula (post anterior) o foco era que os alunos se descobrissem capazes de construir modificar seu próprio universo usando ferramentas e materiais de fácil acesso. Então, para continuar nesta linha, a segunda aula foi sobre materiais, para que eles, através da exploração, descobrissem as diferentes propriedades de cada material.

So, the proposal was to create a lampshade, which consisted in a structure and a cover, using various kinds of papers.
Para isso, a proposta foi de criar uma cúpula para um abajur (estrutura e revestimento) usando diferentes tipos de papéis.

We started with some group dynamics to incentive their creativity.
Começamos com algumas dinâmicas de grupo para incentivo de criatividade.


After that, in groups, they started to explore the materials and to try to build a structure (this had to be taller than 30cm).
Após isso, in grupos, os alunos começaram a explorar os materiais e tentar construir a estrutura (que tinha que ter mais de 30cm de altura).


Each group found their way to accomplish the challenge with colorful ideas!
Cada grupo foi encontrando uma solução com ideias cada vez mais coloridas!


As the aim of the workshop wasn’t to have perfect final products, but to gain knowledge during the experience, we did a little conversation after manufacturing the products, where the students told us what they’ve learned and what they could have done in a different way to achieve a better result.
Como o foco do workshop não era em ter um produto final perfeito, e sim no conhecimento adquirido durante o processo, nós fizemos uma pequena discussão após a construção onde os alunos puderam dizer o que tinham aprendido e nos contar de que outra forma eles poderiam ter feito o produto para obter resultados melhores.

After that we did some groups dynamics about communication ant team work.
Após isso fizemos algumas dinâmicas de grupo para tratar sobre comunicação e trabalho em equipe.


To complete the course, we were going to have a third class where we would explore the relationship between product and the human body, therefore creating a knowledge line that would start “wow! I can build things!”, passing to “Learning how to explore and adapt the materials that I have” and finishing with “The product and myself”. But, unfortunately, the students couldn’t go to the final class. But anyway, they could learn new things and know different ways to deals with the “trash”.
Para completar o curso, nos teríamos uma terceira aula na qual os alunos iriam explorar as relações dos produtos com o corpo humano. Criando assim uma linha de aprendizado que começou com “Olha! Eu posso construir minhas coisas!”, passando por “Aprendendo a explorar e adaptar os materiais que tenho disponível” e terminando com “O produto e eu”. Mas, infelizmente, os alunos não puderam comparecer à terceira aula. Mas mesmo assim conseguiram aprender novas coisas e criar novos olhares para o “lixo”.


I like to thank the Mundaréu NGO, the all the SESC team (specially the trainees Germem and Fúlvia, who helped me during the classes), and for the São Camilo Shelter, for the students.
Thank you very much!


Eu quero agradecer a toda equipe da Mundaréu, a toda equipe do SESC (especialmente aos estagiários Germem e Fúlvia, que me acompanharam nas aulas) e ao abrigo São Camilo pelos alunos!
Muito obrigado!

(For more information about the dynamic, pedagogical methodology and so on, contact me at viraroque@gmail.com)
(Para mais informações sobre as dinâmicas, a metodologia pedagógica  etc, me contate pela viraroque@gmail.com)

Project by/projeto por Nicholas B. Torretta

Jun 30, 2011

First class of the workshop - primeira aula do workshop

Hello!
Oi!

After a long time, I’m back!
Depois de muito tempo, estou de volta!

Sorry about the big gap between the last publication and this, but I have a reason, that will bring some changes to this blog.
I was accepted to a Master degree in Design at Aalto University, in Helsinki – Finland; therefore I have been busy with the preparations (visa and so on). But this is a subject for another post (stay tuned, there are going to happen some nice changes here)

Desculpe pelo enorme tempo entre a última postagem e esta, mas eu tenho um motivo, que trará boas mudanças para este blog.
Eu fui aceito para um mestrado na Aalto University, em Helsinki – Finlândia; portanto eu tenho estado muito ocupado com os preparativos (Visto e etc.). Mas esse é assunto para um próximo post (fique ligado para saber as boas mudanças que ocorrerão aqui).

Ok, today’s post: The workshop at SESC with Mundaréu. We had a lot of complications during the process that, unfortunately, led us to a shorter workshop, with only three classes. So here is the first one:

Bom, o post de hoje: O workshop no SESC com a Mundaréu. Tivemos muitos imprevistos e problemas que nos levaram a fazer um workshop somente de três aulas. Então aqui vai sobre a primeira:

The first class, with children and teenagers from the São Camilo Shelter, had as the subject-verb “to support” and the idea was to present Design to the student trough an intensive and interactive way, without judgments and preconceptions; showing them that they can create their own things and just using discarded materials. Therefore, the aim was not to have a wonderful final product but to gain knowledge with the process.

A primeira aula, com crianças e adolescentes do Abrigo Beneficente São Camilo, teve como tema-verbo “apoiar” e a ideia era de apresentar-lhes o design de uma maneira interativa e intensiva, livre de julgamentos e preconceitos; mostrando a eles que eles podem criar seus próprios objetos e utilizando somente materiais descartados.  Assim, o foco não era de ter um produto final bom, mas sim de conseguir o conhecimento durante o processo.

We started with a group dynamic so that they could feel the importance (by the lack of) of the products that we deal everyday in our life.

Nós começamos com uma dinâmica de grupo, para que eles pudessem sentir a importância (e a falta) que tem os objetos que lidamos diariamente. 

(For more information about the dynamic, pedagogical methodology and so on, contact me at viraroque@gmail.com)
(Para mais informações sobre as dinâmicas, a metodologia pedagógica  etc, me contate pela viraroque@gmail.com)

After that we had a little conversation about the products, art and design.
Depois disso fizemos um bate-papo sobre produtos, arte e design.


After that: “hands on” time!
E depois, claro: mãos na massa!

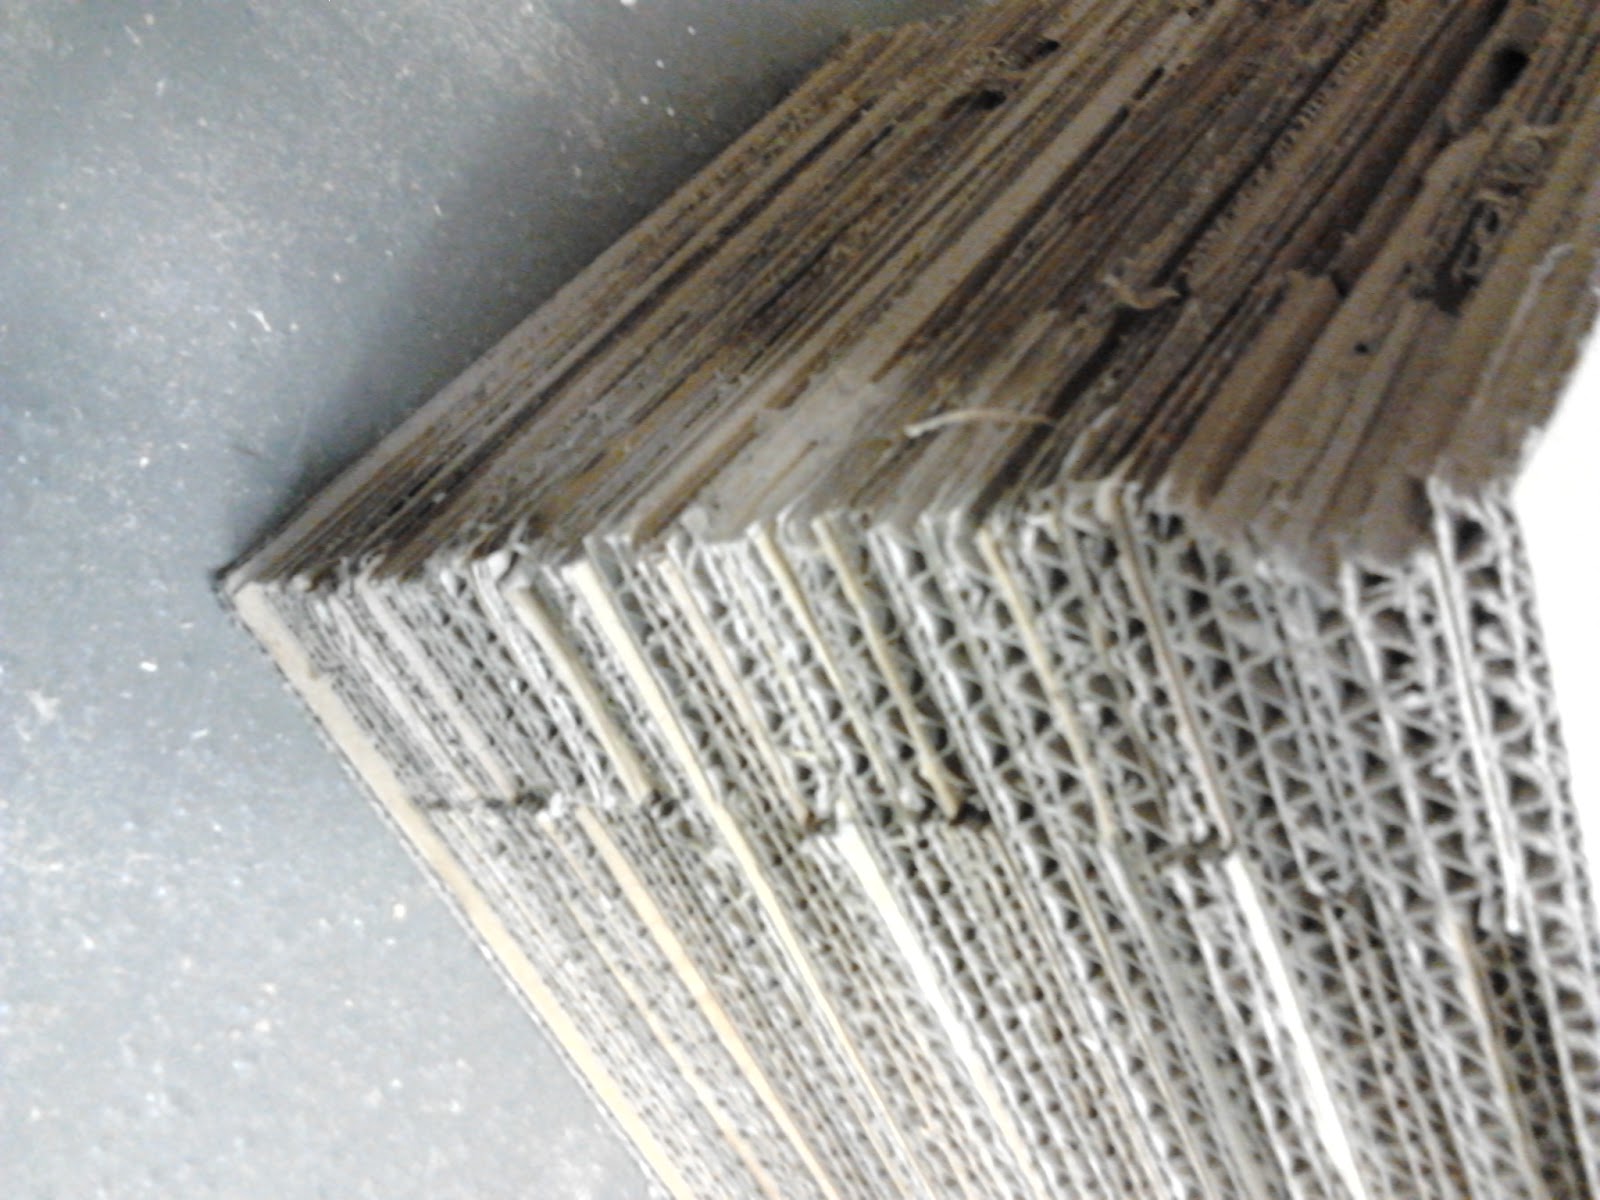
In groups, the students started to search the materials to build their own “supporting” product!
Em grupos, os alunos começaram a pesquisar os materiais para construir um “objeto de apoiar”.


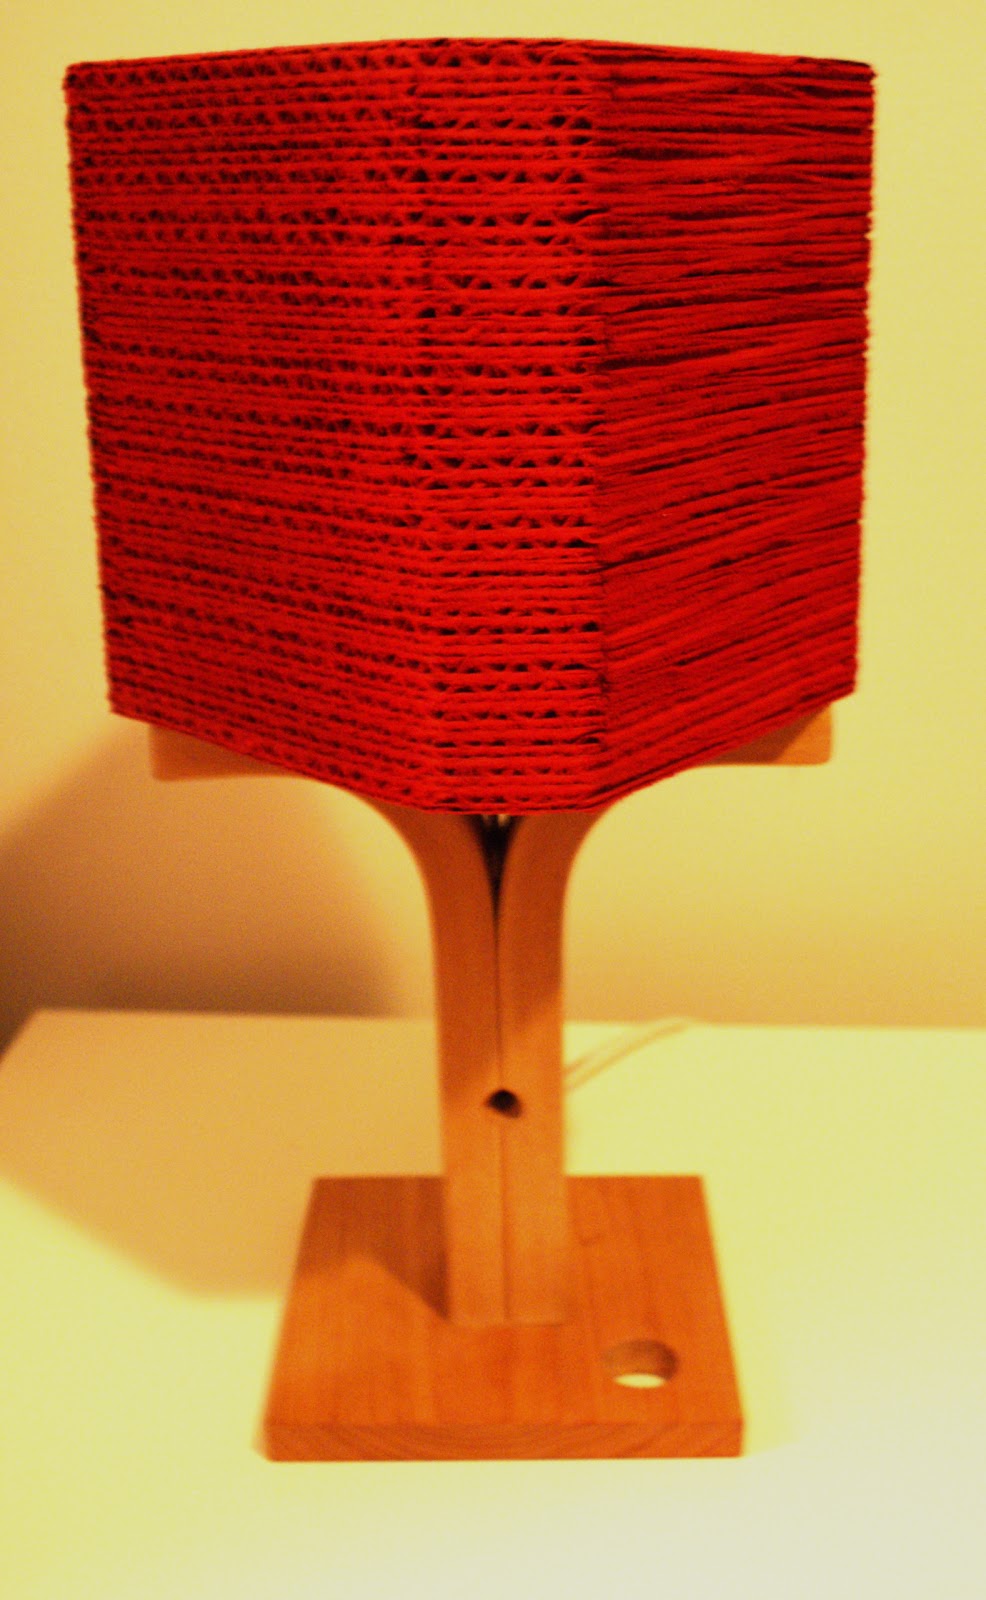
They created a seat, a center table and a basket to hold magazines.
Eles criaram um banquinho, uma mesa de centro e um cesto pra guardar revistas.


Did you see how similar is the seat thay they created and the one that the students from FAAP University created?!??!!

Você reparou na semelhança entre o banquinho que eles construiram e o que foi construidos pelos alunos da FAAP?

So, for today, that’s it!
Por hoje é isso!


Hope you enjoyed!
Espero que tenha gostado!

Next week we have the result from the second class!
Semana que vem tem o resultado da segunda aula!

Thanks!
Obrigado!

Workshop by Nicholas B. Torretta at SESC Ipiranga trough Mundaréu Assoc.
Workshop por Nicholas B. Torretta no SESC Ipiranga pela Assoc. Mundaréu.